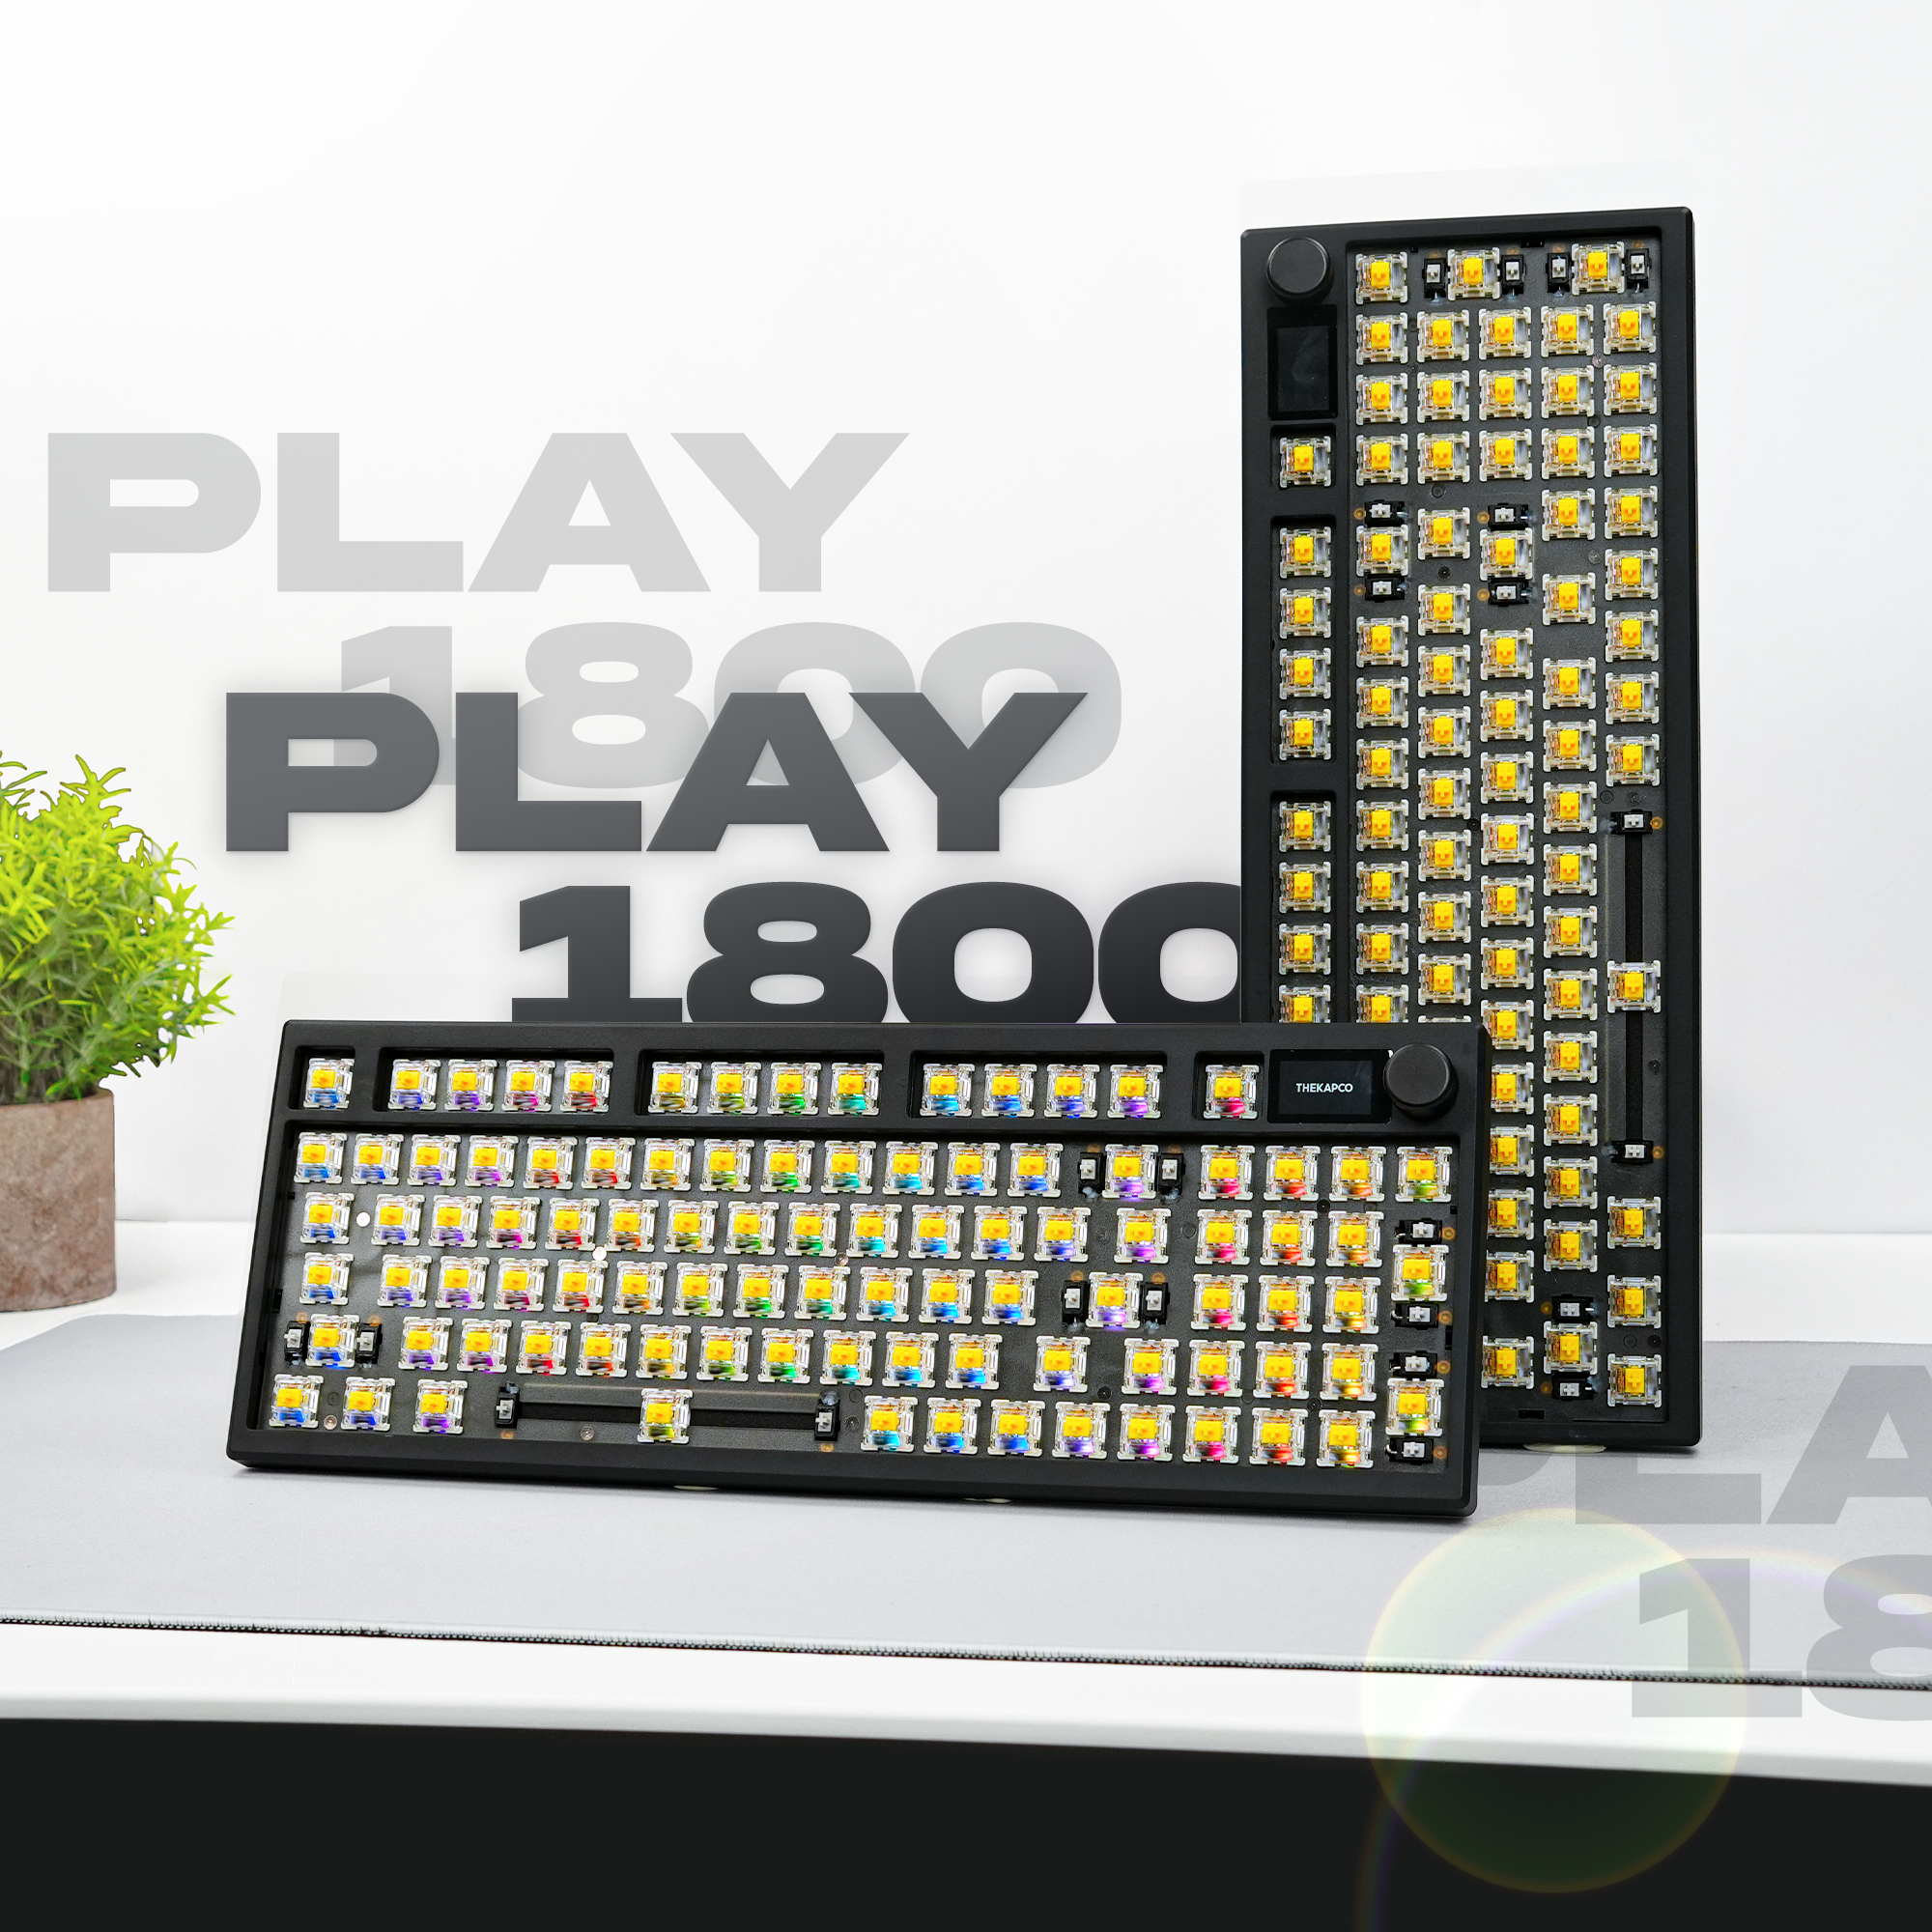
Play 1800 Mechanical Keyboard Review | More than just Play
Overview Play 1800 Mechanical Keyboard is a versatile keyboard for gamers and office use, featuring aesthetic customizable RGB lighting and versatile wired/wireless mode, compatible with PC and mobile devices, making the keyboard highly versatile for gaming and office use. In this article, we will cover all you need to know before getting the keyboard. What’s Tri-mode connectivity? With traditional keyboards, it’s often connected with Cable or Bluetooth exclusively. This model offers three different modes to connect. It’s hard to connect with your crush, but not for this model. Let’s break down what each of the modes does: Wired Mode: Highest performance, Plug & Play Simple Plug-and-Play, the keyboard is connected via USB to Type C cable. This mode offers the lowest latency, suitable for competitive gaming. Bluetooth: Highest versatility, Compatible with most device wirelessly The connection is established wirelessly, allowing for any device with Bluetooth support including Laptop, PC, Android, IOS and Mac. Play 1800 model allows for multiple devices to be connected at once via Bluetooth (more detail in instruction manual), with hotkey to swap between devices for use. 2.4Ghz Mode: Lowest latency wireless mode, requires a dongle This mode requires a dongle (a small USB wireless receiver is provided) to establish a connection to the device wirelessly. This mode features best wireless performance with minimum latency. This mode is perfect for gamers looking for wireless setup, with latency indistinguishable from wired mode. For more details, check here for the comparison between 2.4ghz and Bluetooth in-depth. (https://www.corsair.com/us/en/explorer/gamer/headsets/24ghz-vs-bluetooth-which-is-better ) TIP: The keyboard can be switched to any of the wireless modes while it’s being connected with a cable. This allows the keyboard to be connected automatically via wireless connection once the cable is detached. Wait… A display on the keyboard? You heard that right, Play 1800 features a tiny display that shows information about the system such as battery life, time and date, cap lock etc. which makes user experience more friendly. And for those looking for styles, there’s also Thekapco signature animation for the display. What a time to be alive where the display on your keyboard has higher resolution than a Nokia 3310. What can you do with the RGB Customization? Whether you are a gamer or not, you can’t deny RBG on a keyboard is cool. And this model did not disappoint with the number of customizations straight out of the box. Adjustable color, brightness, and patterns make it feel more alive. My personal favorite has to be the wave pattern, which makes your keyboard a nice visual candy. It also comes with VIA (https://www.caniusevia.com/docs/specification) support, for those keyboard enthusiasts looking to push the customization to its limit, this keyboard is perfect for you. It’s one of those “party” tricks if you’re cool enough to bring a keyboard to one. Of course, you can always turn off the lighting, so your co-workers do not fidget with your keyboard. How’s the build of the keyboard? Play 1800 features a 90% key design, totaling 96 keys. All keycaps from Thekapco are compatible with the keyboard. It’s packed with Gateron G Pro 2.0 Yellow Linear switches (https://www.theremingoat.com/blog/gateron-g-pro-3-yellow-switch-review ). The keys are very quiet, smooth and consistent, making it ideal for office work, and midnight gaming, if noise is a concern to you. Each of the switches is fully swappable too to suit your preferences and needs. The keyboard is built with high-quality polymer, easy to clean and resistant to fingerprint smudges. Overall, the model feels premium, with the only minor caveat being a slight flex in the middle when keys are pressed forcefully. Who should get it? Play 1800 offers amazing versatility, it is perfect for both gamers and office workers. With its customizable RGB lighting, quiet linear switches, and multiple modes of connectivity, it makes it a product that shines with style whilst not compensating for its functionality. TL; DR The Play 1800 is a versatile keyboard with features for both gamers and office users. It offers: Tri-mode connectivity: Wired, Bluetooth, and low-latency 2.4Ghz wireless. Customizable RGB lighting: Great personalized tool for your setup with VIA support. Quiet linear switches: Ideal for both work and play without disruption. Hot-swappable switches: Easily customizable switches to your own need. 96-key layout: Saves desk space without compensating functionality. Built-in display: Shows battery life, time, and miscellaneous info. Caveats: Slight flex in the middle of keyboard with forceful presses. Overall, Play 1800 Mechanical Keyboard offers tons of features for any workers who value versatility and style.
Why EU/British Use ISO Keyboard: A Guide to the Differences and Benefits
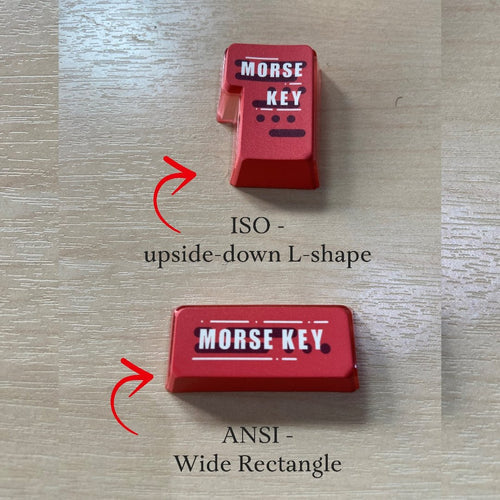
If you are looking for a new mechanical keyboard, you might be wondering what are the differences between the ANSI and ISO layouts.3 These are the two most common physical layouts for mechanical keyboards, especially in Western countries. The physical layout determines the size and placement of keys, while the visual layout determines the order of alphabetical or numerical keys, such as QWERTY or Dvorak. The ANSI keyboard is the most common layout overall, especially in the US. In contrast, the ISO keyboard is primarily found in Europe and elsewhere. In this article, we will discuss the main differences between the two layouts and why you might prefer one over the other. The Main Differences Between ANSI and ISO Keyboards There are five differences between the ANSI and ISO keyboard layouts. These differences involve the placement and shape of the:- enter key, left shift key, backslash key, right alt key, and alt graph (AltGr) key. An ANSI keyboard features 104 keys in full size and 87 keys in compact form, while an ISO keyboard has 105 keys in full size and 88 keys in compact form (one extra). Enter Key On the ANSI layout, the enter key is wide and rectangular, whereas on the ISO layout the enter key is much larger and taller, shaped like an upside-down L-shape. The ISO layout follows the ISO convention of having an enter key in the third row, while the ANSI layout follows the ANSI convention of having an enter key in the second row. The advantage of the ISO enter key is that it is easier to reach with your pinky finger and it covers more space on the keyboard. The disadvantage is that it reduces the size of other keys around it, such as the backslash key and the left shift key. Left Shift Key On an ANSI keyboard, the left and right shift keys are the same size, long and rectangular. On an ISO keyboard, the left shift key is about half the size of the right shift key (at about the same size as the left ctrl key). This is because of the extra key that is added next to the enter key on the ISO layout. The advantage of the ANSI left shift key is that it is easier to press with your pinky finger and it covers more space on the keyboard. The disadvantage is that it might be harder to press with your ring finger if you use a different typing technique. Backslash Key On an ANSI keyboard, the backslash key is directly above the enter key at the same size as the right ctrl key. On an ISO keyboard, it’s directly to the left of the enter key at a smaller size. This is because of the different shape of the enter key on each layout. The advantage of the ANSI backslash key is that it is easier to reach with your pinky finger and it has a consistent size with other keys on its row. The disadvantage is that it might be harder to press with your ring finger if you use a different typing technique. Right Alt Key The right alt key and left alt key are identical on an ANSI keyboard. On an ISO keyboard, the right alt key is replaced by the alt graph (also known as AltGr) key. This key enables users to easily type characters that have diacritics, such as á or ñ. The advantage of the AltGr key is that it allows users to access more symbols and characters on their keyboard without changing their visual layout or using additional software. The disadvantage is that it might interfere with some shortcuts or commands that usethe right alt key on other layouts. Number of Keys An ANSI keyboard features 104 keys in full size and 87 keys in compact form, while an ISO keyboard has 105 keys in full size and 88 keys in compact form (one extra). The extra key is added next tothe enter key on the ISO layout to accommodate # (number sign) and ~ (tilde). The advantage of the extra key is that it allows users to type these symbols without using shift or AltGr modifiers. The disadvantage is that it adds more complexity and inconsistency to the keyboard layout. Why Do British or EU People Use ISO Layout? The ISO layout is popular in Europe and elsewhere because of the inclusion ofthe AltGr key and the larger enter key. These features make it easier for users to type characters that have diacritics, such as á or ñ, or currency symbols, such as £ or €. These are common needs in the United Kingdom and Ireland. The ISO layout also follows the ISO convention of having an enter key inthe third row, which is more ergonomic and comfortable for some users. The ISO layout also conforms to the British Standard BS 4822, which defines the physical layout and labeling of keyboards in the UK. The Difficulty of Finding ISO Keyboards and Keycaps One of the drawbacks of using an ISO keyboard is that it might be harder to find than an ANSI keyboard, especially in the US market. Most keyboards sold online or in stores are designed for the US layout, which means that users who prefer the ISO layout might have fewer options or higher prices. Another difficulty is finding compatible keycaps for customizing or replacing keys on an ISO keyboard. Keycaps are the plastic covers that attach to the switches on a mechanical keyboard. They come in different shapes, sizes, colors, and materials, and they can affect the feel and look of a keyboard. However, not all keycaps are compatible with all keyboards. Because ofthe differences between ANSI and ISO layouts, users need to make sure thatthe keycaps they buy match their keyboard layout. For example, an ANSI enter key will not fit on an ISO keyboard, and vice versa. Finding ISO keycaps might be more challenging than finding ANSI keycaps, because most keycap sets are designed for the US layout. Users who want to customize their ISO keyboard might have to search for specific keycap sets that support the ISO layout, or buy additional keys separately. Thekapco: Your Solution for ANSI Mechanical Keyboards and Keycaps At Thekapco, we specialize in a wide range of ANSI mechanical keyboards and keycaps. Whether you're looking for a full-size or compact keyboard, wired or wireless options, we have a variety to suit your needs. We offer a diverse selection of keycap sets in different colors, materials, profiles, and legends, all compatible with the ANSI layout. Additionally, we provide custom-made keycaps that you can design to your personal preferences. Our commitment is to offer high-quality products and services at affordable prices for all ANSI keyboard users. If you want to learn more about our products or place an order, please visit our website or contact us via Instagram.
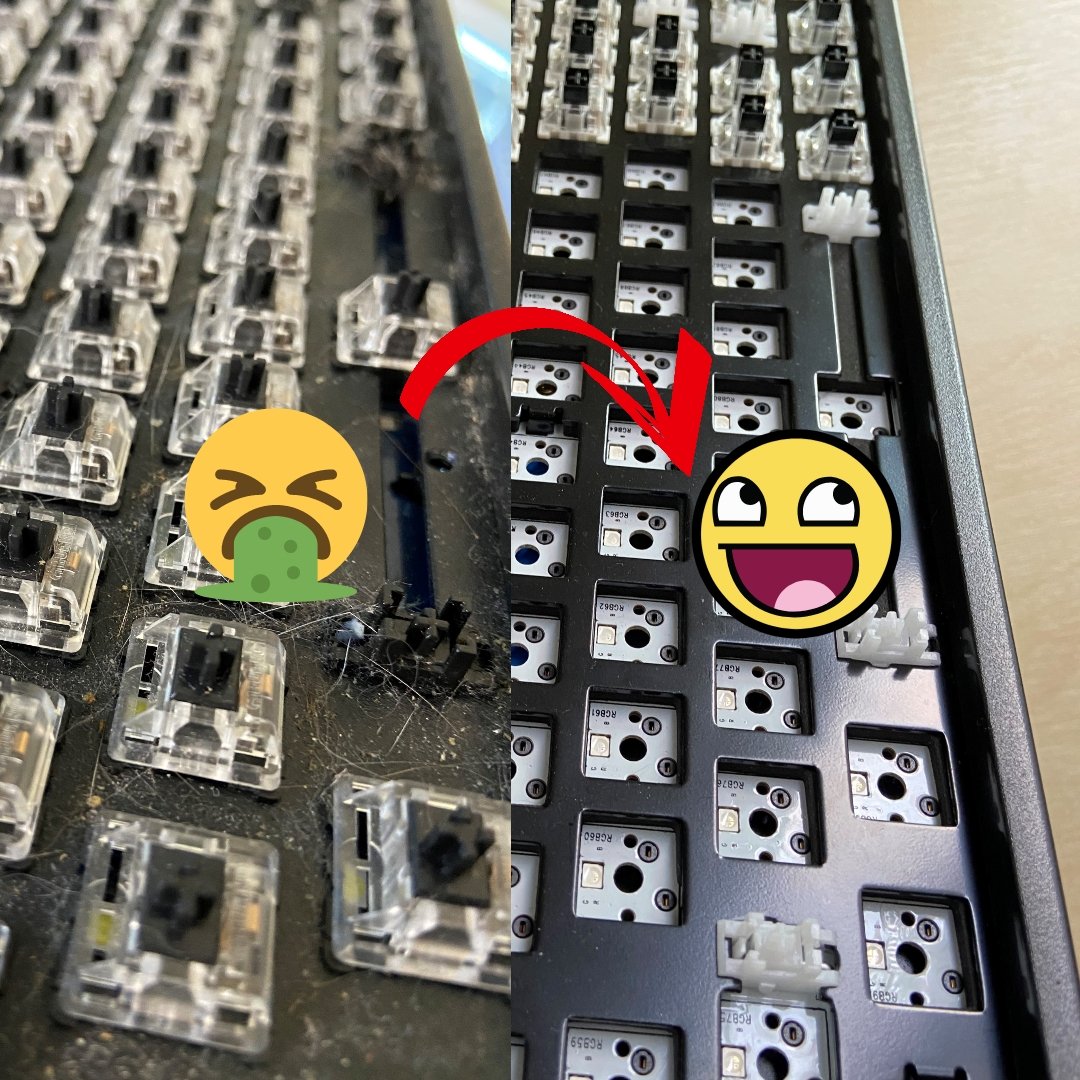
6 easy steps to Clean Your Mechanical Keyboard
Introduction Is your mechanical keyboard in desperate need of a good cleaning? Look no further! In this guide, we will walk you through a simple and effective process to safely clean your keyboard. Let's get started! Step 1: Removing the keycaps Begin by using a keycap pulling tool (available online) to gently remove all the keycaps from your mechanical keyboard. Remember to take a photo of the keyboard before removing the keycaps to make reassembling easier later on. Step 2: Cleaning the keycaps Prepare a bowl or cup with warm water and add a small amount of dishwashing detergent. Immerse the keycaps in the warm, soapy water and gently swirl them around for about 30 seconds. Let the keycaps sit in the mixture for 15 to 20 minutes to allow the detergent to dissolve any grease and grime. Step 3: Drying the keycaps After the soaking time, rinse the keycaps under clean, cold water to remove any soap residue. Dry each keycap thoroughly using a towel or rag. To ensure all moisture is removed, tap the keycaps against the towel or a clean surface. Leave them to air dry for a couple of hours before moving on to the keyboard. Step 4: Brushing the mechanical keyboard Take a soft bristle brush and gently brush the keyboard to remove any debris, crumbs, or fur. Avoid using a vacuum cleaner, as it can generate static electricity. Mechanical keyboards are built to be sturdy, so don't be afraid to apply a bit of pressure while brushing. Step 5: Wiping the mechanical keyboard with cotton bud Ensure the keyboard is unplugged and has no power supply. Dampen a cotton bud slightly and carefully run it along the length of the keyboard. This will help remove any dirt or grime. If desired, you can use a small amount of rubbing alcohol or an alcohol-based cleaner, but water alone works just fine. Step 6: Reassembling the mechanical keyboard Once the keycaps are completely dry and the keyboard is clean, it's time to reassemble. Take your time to align and place each keycap back onto the keyboard. Refer to the photo you took earlier if needed to ensure correct placement. Conclusion Congratulations on successfully cleaning your mechanical keyboard! By following these straightforward steps and incorporating regular cleaning habits, you can keep your keyboard in excellent condition. We hope you found this guide helpful. If you have any comments or suggestions, please feel free to share them. Happy typing!
Upgrade Your Gaming Setup: Must-Have Accessories for Gamers
As a gamer, having the right accessories for your gaming setup is vital for optimal performance and extended gameplay. The accessories you choose can significantly enhance your gaming experience and create you a gaming room that you'll never want to leave. In this article, we'll explore the top five must-have accessories you need to upgrade your gaming setup and take your gaming to the next level. The First Accessory to Buy When Building a PC When building a PC, the first accessory to purchase should be a high-quality gaming mouse. A gaming mouse enhances your accuracy, providing more control over your movements in the game. The adjustable sensitivity feature is crucial since it allows you to customize your settings to your preferences and optimize your gaming performance. Must-Have Accessories for Every Gamer Apart from a gaming mouse, every gamer should have a gaming keyboard with cute keycaps. These keycaps can improve gameplay by helping you find the keys you need more quickly. Additionally, a good gaming headset is essential for communicating with your teammates and immersing yourself fully in the game. Opt for a headset with excellent sound quality and a comfortable fit. Finally, a good gaming chair that provides proper support and comfort is a must-have for any serious gamer. A chair that is adjustable and provides good back support will help you maintain a healthy posture and avoid any discomfort during extended gaming sessions. Top 5 Must-Have Accessories for Gamers Cute Keycaps: The perfect way to add personality and style to your keyboard. The KapCo offers an extensive collection of keycaps, including anime keycaps, gradient keycaps, and Japanese keycaps, to help you upgrade your gaming setup. Gaming Mouse: A high-quality gaming mouse is essential for any gamer. It provides precision and accuracy for quick movements and helps enhance your gaming performance. Gaming Keyboard: A gaming keyboard with cute keycaps is a must-have for any gamer. The keycaps improve gameplay by making it easier to find the keys you need, while the keyboard itself can be customized to your preferences. Gaming Headset: A gaming headset is essential for communicating with your teammates and immersing yourself in the game. Look for a headset with good sound quality and a comfortable fit. Gaming Chair: A good gaming chair is crucial for providing proper support and comfort during extended gaming sessions. Look for a chair that is adjustable and provides good back support. Cost of a Gaming Setup The cost of a gaming setup depends on the quality and brand of accessories you choose. A basic gaming setup can cost anywhere from $500 to $1000, while a high-end setup can cost upwards of $5000. At The KapCo, we offer a range of cute keycaps at affordable prices, making it possible to upgrade your gaming setup without breaking the bank. Conclusion Upgrading your gaming setup with the right accessories can significantly enhance your gaming experience. Cute keycaps, a gaming mouse, keyboard, headset, and chair are must-have accessories for every gamer. These accessories improve performance, comfort, and functionality during extended gaming sessions. Visit The KapCo to find a wide range of cute keycaps and other gaming accessories at affordable prices.